We’ve written about how our Quality Assurance department is one of the most proactive components of our business in guaranteeing quality across our products.
While we’ve written about the different levels of certifications Boshart employs on its products, we thought we’d take a deeper dive into 20 of the different quality assurance tests we perform on products we carry.
For privacy reasons, we can only go into so much detail about our equipment and our processes, but we’ll still aim to provide you with a general overview of what tests we perform along the way.
To get more information on our Quality Assurance Department, check out our blog, We Rebuilt our QC Department from the Ground Up.
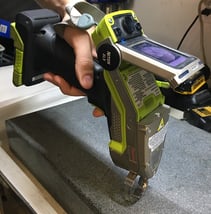
- ALLOY ANALYSIS
Utilizing X-ray technology, we’re able to perform a non-destructive alloy analysis on brass, bronze, and stainless steel alloys to ensure the proper compositions have been created for various products.
- IMAGE MEASUREMENT MACHINE
Through optical comparisons on a 2D plane, we can measure as many as 42 critical measurements in an area as small as 6 square inches. A test like this can be performed in about 12 seconds.
- TENSILE STRENGTH TESTING
Boshart has a custom-designed tensile testing machine that gives us the ability to perform pull-apart and crush testing right here in-house. This machine is rated up to 30,000lbs of pressure for certain tests. We also have a 0-350-lbs tensile machine, which allows us to complete comparison testing on items like PTFE tapes.
- HOOP STRENGTH TESTING
On various products, we’ll utilize tapered cones to test a product’s resistance to stress cracking in different MPT and FPT connections (among others).
- JOINT STRENGTH TESTING
When we’re evaluating potential suppliers, joint testing rigs give us the ability to more accurately perform tests to the point of failure to discover any weaknesses within a particular product. This also allows us to make sure that, over time, a supplier doesn’t make any unauthorized changes that might affect the performance of a valve, for example.
- HYDROSTATIC / BURST PRESSURE TESTING
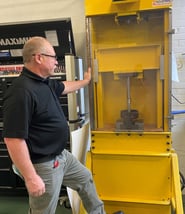 With the ability to test products up to 2200 PSI, our hydrostatic testing equipment allows us to confirm whether our products can withstand their maximum allowances.
We custom designed a multi-port pressure tester which specifically allows us to test the various aspects of our tank tees and constant pressure manifolds.
- MULTI-PORT PRESSURE TESTING B
Yet another custom-built machine, our multi-port pressure tester allows us to test up to 8 different fittings simultaneously. Its primary intention is to test blow-off pressure or relief valves, ensuring they meet industry standards.
- FINISH COAT ANALYSIS
By simply touching the probe of our equipment to the surface of particular products, we can test the thickness of galvanized coatings and paint thickness in a non-destructive format. We track these readings over time to help us identify trends with particular suppliers, initiating preventative measures if needed.
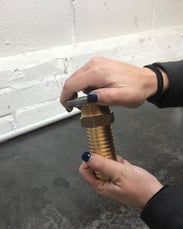
- THREAD GAUGING
Using plug gauges and ring gauges, we can check the depth of threading on male and female tapered pipe threads (FPT and MPT).
- SOLDER (SWEAT END) GAUGING
We use Go/No-Go gauges to ensure certain female solder ends are not undersized (too tight for use) or oversized (too loose for use).
- INSERT DIAMETER GAUGING
Again, Go/No-Go gauges check the outside diameter of poly pipe insert ends to ensure they’re manufactured to ASTM standards. This ensures fittings aren’t too tight or too loose.
- GRIPPER RING DIAMETER TESTING
Boshart has developed a new and innovative way to allow testing of gripper rings in push-fit fittings and valves. By using these gauges, we can test product much more effectively and efficiently, making these fittings one of Boshart’s most stable product lines.
- TORQUE TESTING
Clamps, for example, must be able to withstand the SAE torque specification of 60 inch-lbs. We ensure that Boshart clamps maintain a minimum of 75 inch-lbs. We even carry clamps that consistently achieve 85-100 inch-lbs in testing; well above the ideal breaking point.
- FREE TURNING TORQUE TESTING
We use a ratcheting torque driver to ensure that our clamps meet the free-turn expectations, ensuring that with no more than 3 inch-lbs of force during opening and closing, the clamps won’t bind under no load conditions.
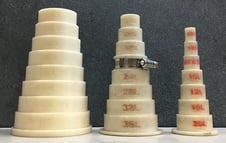
- SIZE RANGE TESTING
3D printed specialty gauges allow us to accurately check the size range of gear clamps, verifying they meet large and small diameter standards.
- PERFORMANCE TESTING
A pull test, developed by Boshart, ensures the proper fit of the O-rings in our pitless adaptors, guaranteeing they are not too tight or too loose to be removed.
- PRODUCT NET WEIGHT TESTING
Checking the weight of a given part is a quick, effective way to monitor foundries and factories, making sure they do not modify mold cores or machine out/off extra material.
- DUROMETER TESTING
A shore A durometer gives us the ability to test the hardness or rubber so that it contains the proper compressibility without being compromised.
- VERIFICATION OF PRODUCT CERTIFICATIONS & MARKINGS
Checking parts to ensure they’re displaying the proper third party certifications is a very important part of our Quality Assurance program. This protects our customers against fraudulent certificates and guarantees standards requirements.
IN CONCLUSION
These are just some of the many tests we perform on our products to ensure that, even among a good working relationship with a given supplier, our quality never slips over the course of time.
Our goal is always that the name “Boshart” be synonymous with “Quality”, and going through the in-depth, relentless processes outlined here (and the countless not mentioned) ensure that we are meeting that goal.
Have further questions about this subject?
Head over to Boshart's Knowledge Base: technical product information, guidelines, and more.


![[Video] The Basics on Water Filtration](https://blog.boshart.com/hubfs/36.jpg)

SHARE