Plumbing failure is something no contractor ever wants to deal with. Even the words “plumbing failure” can strike fear in the hearts of the most brave plumbers out there.
Thankfully, there are a handful of key ways to protect yourself (and your customers) against catastrophic failure that could result in thousands of dollars in damage or much worse.
Whether you’re still using copper, or you’ve made the switch to PEX, we’ve got some tips we believe all plumbers would benefit from knowing.
By no means is this blog an exhaustive guide on the topic, because every day, something new is being discovered or invented that can cause issues to appear or disappear in an instant.
Without any further ado, let’s jump in.
1 – Ensure All Connections are Proper
Improperly making the connection between fittings and PEX tubing is one of the easiest ways for things to go wrong. Thankfully, correcting this issue is one of the easiest on the list, and that’s why we are starting off with it.
Here are a few of the most common types of connections and how to ensure you have executed them properly:
Pinch Clamps
Most pinch clamp tools will not release without having been fully actuated. As long as your clamp is between 1/8” and 1/4” from the end of the PEX tube and placed squarely over the barbs, your connection should be safe if the jaws of the tool have released.
Of course, these tools may vary from one manufacturer to another. Use caution depending on the particular tool in your toolbox.
Crimp Rings
A GO NO-GO Gauge is one of the most reliable ways to ensure a crimp ring connection has been properly made. A gauge like this will not protect against improper location of your connection, so it is still up to you to make sure the ring is sitting between 1/8” and 1/4” away from the end of the PEX tube. With many poly fittings, there are additional plastic nubs which help you align all the components properly.
Compression Connections
Prior to threading the nut onto the fitting, it should be easy to determine that the PEX tube has been seated fully into the fitting. When you have hit resistance and the tube cannot be inserted any further, you know you are ready to begin fastening the nut.
Quick Connections
A quick connect or push connect fitting is one of the most difficult to ensure a proper connection has been made because the entire end of the tube is covered by the fitting. It is recommended that you make a small mark on the PEX tube with a permanent marker prior to installation so that you will know when the tube has been seated fully. Some manufacturers provide marking on the PEX tube itself, but this requires making cuts at exactly the right locations to utilize them, which is not always possible for many reasons.
2 – Secure Your Plumbing Properly
To protect your plumbing system, piping must be properly supported to a floor/ ceiling joist, or studs in walls in accordance with applicable plumbing codes. Loose piping can cause countless issues relating to increased tension on joints leading to fitting or joint failure. Improperly supported piping can also result in rattling in walls due to water hammer.
Local plumbing codes dictate the distance between supports, this may vary depending on location, however we recommend not exceeding 30” – 34” horizontally. Any major direction changes, such as bends around corners should also be secured with supports, hangers, strapping, or clamps. Pipe strapping supports should be firm but loose enough to allow the PEX pipe to move as it expands and contracts.
3 – Provide a Proper Radius Around Corners
If you are not careful, plumbing failure can occur in a situation as simple as bending around a corner too sharply. It is especially important not to create kinks in your PEX pipe. Kinks can result when changing direction too suddenly, creating loops too tightly, or trying to bridge the gap too quickly when making offsets.
It is imperative that you never bend PEX pipe around a corner in a radius less then 8x the outside pipe diameter (FIG.3). Doing this will cause the pipe to kink, meaning it is damaged beyond repair. The flattened / damaged section of pipe must be cut out and replaced.
If using coiled PEX pipe that must be bent in a direction against that of the coil, the minimum bending radius is 24x the outside diameter of the pipe (FIG.3).
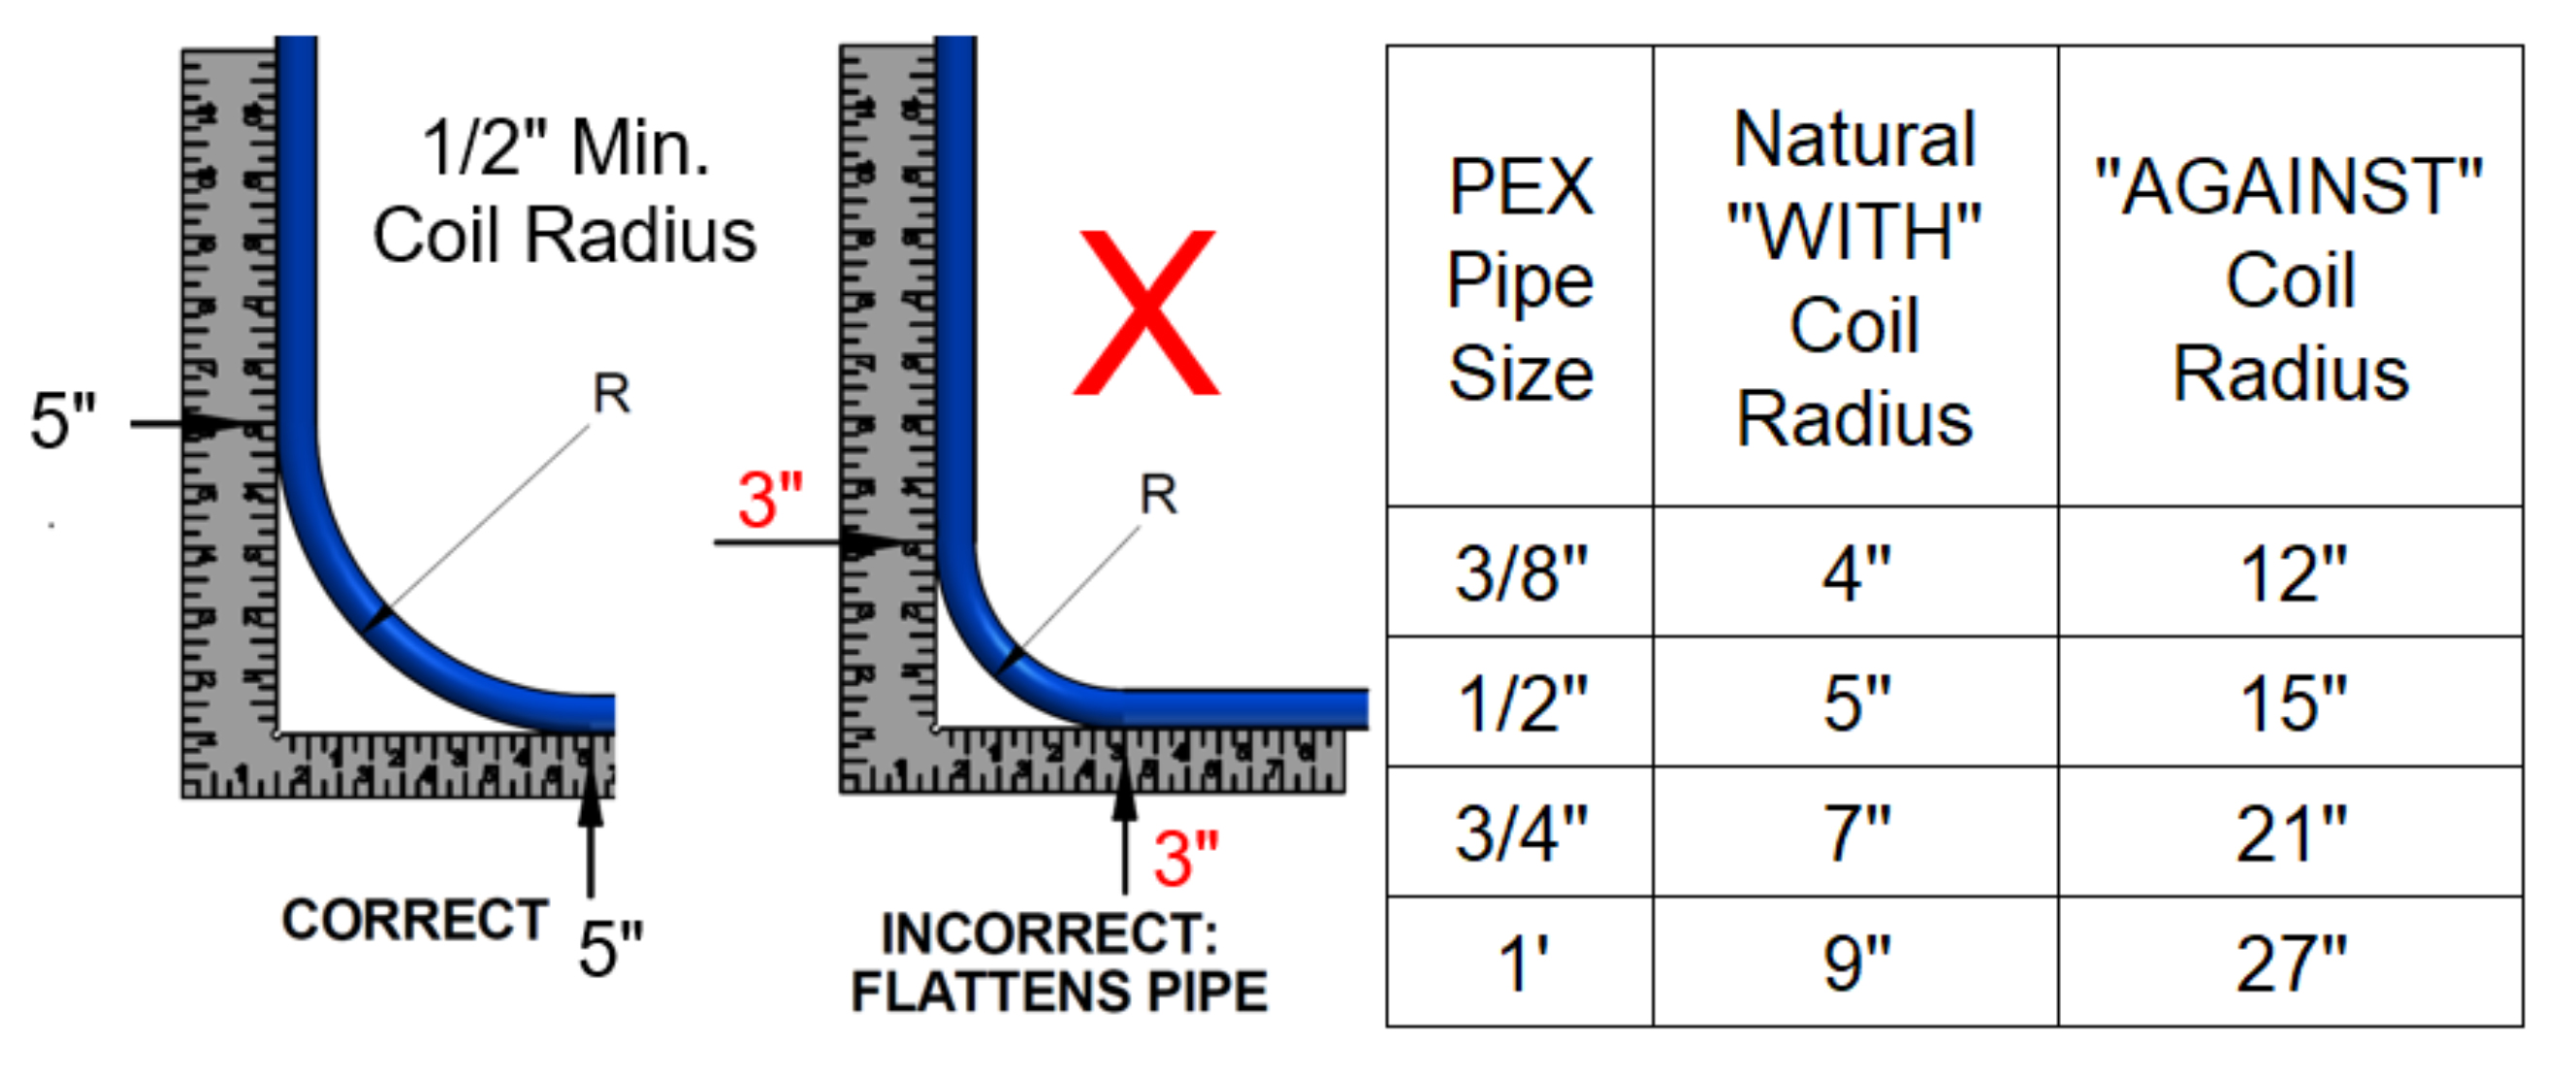
Figure 3
We also recommend not bending PEX pipe within a 3-1/2” stud width. When stubbing out, use a copper stub-out elbow, or bend support bracket or a 90 °Elbow (A sweep type elbow is recommended). Metal or plastic bend supports should be used when making a 90° turn. In any circumstance that you cannot allow the advised minimum radius in a PEX bend, utilize an elbow fitting to protect your tubing.

Figure 4
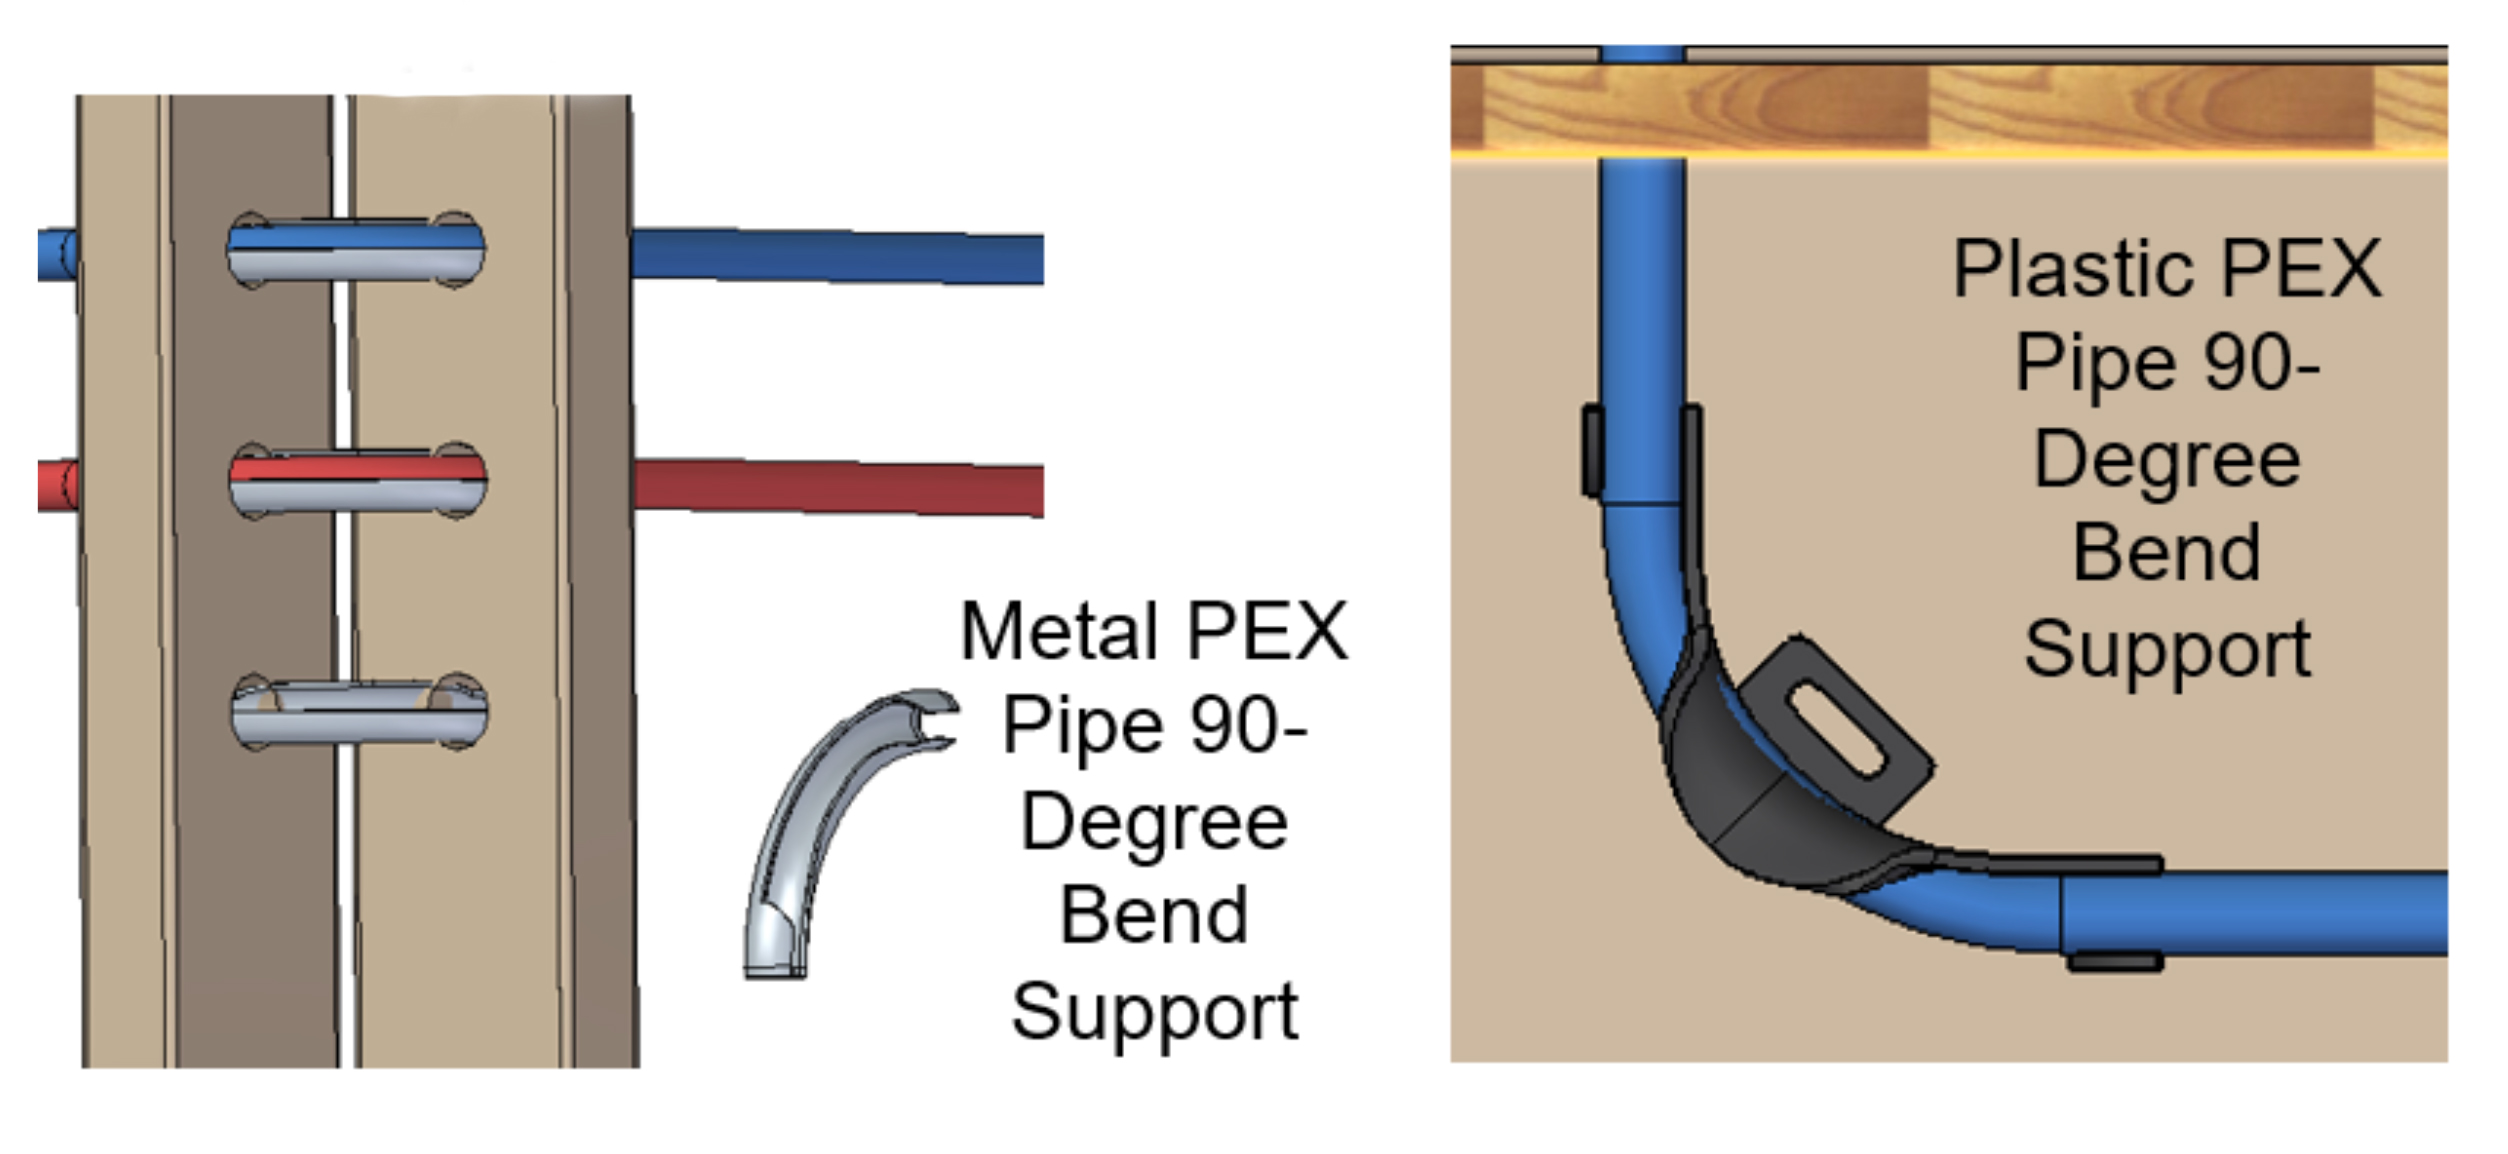
Figure 5
Want more ways to protect your plumbing?
Download our eBook How to Prevent Catastrophic Plumbing Failure for 6 other ways to protect your plumbing.
Have further questions about this subject?

Head over to Boshart's Knowledge Base: technical product information, guidelines, and more.


SHARE