Torque arrestors may be hidden underground in your well, but that doesn't mean they aren't important. When installed, torque arrestors protect the drop pipe from the daily wear and tear caused by start up torque, hence their name. To ensure they are being used to their highest ability, they need to be properly installed. To find out why you should install a Torque Arrestor, check out our blog, Why Install a Torque Arrestor?.
In this blog, we will walk through the 7 steps you should follow to safely and accurately install a torque arrestor. We have included a diagram and a picture to give you something to refer to, ensuring a smooth installation process. Let's get started.
Installation Process: 7 Step-By-Step Guide
A torque arrestor is designed for 1" and 1-1/4" drop pipe in wells that 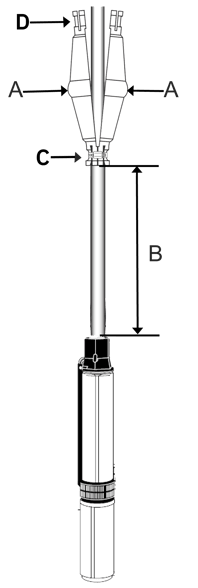 have 4" to 8" inside diameters (ID). To safely and accurately install a torque arrestor, it is recommended that you have a second set of hands to help.
Step 1. First, place one half of the torque arrestor onto each side of the drop pipe, ensuring the drop pipe is between the evenly spaced halves (A).
It is important to ensure the first torque arrestor is placed a minimum of 18" but no more than 2' above the submersible pump (B). The torque arrestors should then be placed at intervals of 75' to 100' above the first torque arrestor.
Step 2. You can then install the lower pipe clamp onto the torque arrestor, tightening to 60-inch lbs (C).
Step 3. Then, install the upper pipe clamp, leaving it loose.
Step 4. Grab both halves of the torque arrestor at the top (D), manually forcing them downward, causing the center section (A) to expand outward until it is slightly larger than the I.D of the well casing. You will want to ensure a snug fit to brace against the inside of the well casing. The well casing can range in diameter from four to eight inches.
Step 5. Next, hold the torque arrestor in the desired expanded position, tightening the upper clamp. It is important to ensure the upper clamp is tightened to 60-inch lbs. This will ensure the clamp does not slip when the pump is removed.
Important note: the fit should be snug enough that the friction fit inside the casing does not spread so much that it becomes difficult to insert it
into the well casing.
Step 6. Now that the torque arrestor is secured in position, the pump cable and the safety rope can be inserted through the opening between the halves outside of the gear clamps. You can then secure the pump cable and the safety rope to the drop pipe above and below the clamps using cable ties.
It is recommended that the securing of the pump cable and safety rope is on the outside of the torque arrestor, as seen in the picture. If the clamp shifts or slips, there could be a risk that the metal clamp would cut into the pump cable causing an electrical shortage.
Step 7. You have now successfully, safely and accurately installed a torque arrestor. It should look like the picture on the picture on the right.
In Conclusion:
Following a step-by-step guide can help you install the torque arrestor correctly the first time and the diagram can confirm that your installation process is similar to the correct process. When properly installed, torque arrestors play an important role in solidifying a long life for your submersible pump system.
Have further questions about this subject?

Head over to Boshart's Knowledge Base: technical product information, guidelines, and more.

SHARE