If you are having problems with your wall hydrant, don't worry. In most cases, the entire wall hydrant does not need to be replaced. Replacement parts are available to help fix the issues that can happen when using a wall hydrant.
To repair a leaking or malfunctioning wall hydrant, the first and most important step you need to take is to confirm the make and model to ensure the right replacement parts are available.
In this blog, we cover the most common issues a wall hydrant can have, what caused the issue and how it can be fixed. We have even included step by step guides to ensure the replacement process goes smoothly.
For more information on all things wall hydrants, check out our blog, The Basics on Wall Hydrants.
Wall Hydrant is Leaking when Closed (Off)
The cause of this is most likely a worn out washer or broken faucet seat. The recommended repair is to replace the freeze-proof plunger (check valve) assembly. An easier option may be to replace the entire stem assembly. This is especially key if you notice any wear on the other components in the stem assembly.
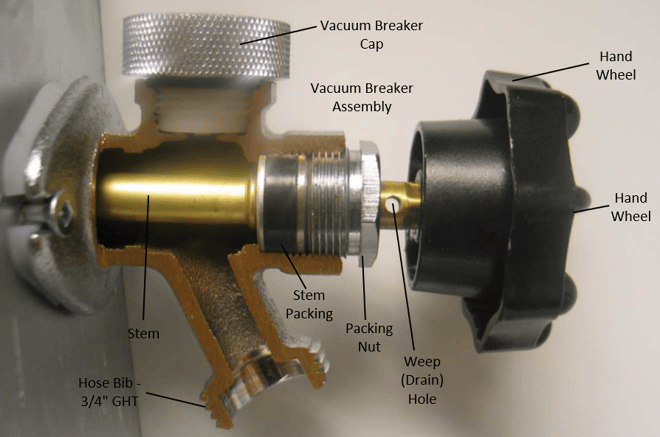
In order to confirm what part of your wall hydrant is leaking, refer to the picture below. This will help you identify the issue and give you the correct terminology to correctly fix the issue.
Wall Hydrant is Leaking when Open (On)
It could be because it is leaking out of the packing nut (bonnet):
This issue may be caused by a loose packing nut or worn out stem packing seal. Replacing the stem packing will fix the issue but if the other components are showing signs of wear, it is recommended that you replace the entire stem assembly to err on the side of caution.
It could be because it is leaking out of the Vacuum Breaker Cap (Air-Vent):
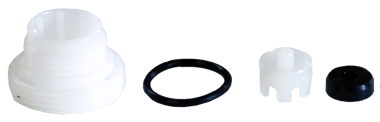
A worn, broken or a missing vacuum breaker part could be the cause of the leaking. To repair, remove the old parts and replace them with a new assembly kit.
It could be because It is leaking out of the Weep Hole during use:
This issue is caused by a worn out O-ring on the check assembly. The issue will arise over time or if the faucet is left "on" for a long period of time. To fix the leak, you will need to get a new plunger (new check assembly) or replace the entire stem assembly if the other components warrant a replacement.
8 Steps to Replace the Packing, Plunger or Stem Assembly
- Shut-off the water supply to the wall hydrant, open the wall hydrant all the way
- Remove the handle
- Loosen the packing nut (bonnet) using a wrench then remove the stem assembly
- Once the stem is removed, briefly turn the water supply back on to flush any debris from the hydrant, then shut-off it off again
- Inspect the stem for any cracks or damages to the O-rings or other parts
- Determine which parts require replacement
- Reinstall stem with bonnet in the open position, close hydrant and turn the water back on to the wall hydrant
- Inspect for any leaks
6 Steps to Replace the Vacuum Breaker Assembly
- Shut-off the water supply to the wall hydrant, open the wall hydrant all the way to release pressure, drain the faucet
- Remove vacuum cap
- Remove the vacuum breaker assembly
- Reinstall the new vacuum break kit
- Close the hydrant then turn the water back on to the valve
- Inspect for any leaks
In Conclusion:
Before ripping out the entire wall hydrant from the side of your house, determine what the issue is and use our guide to figure out the best way to fix the problem. Stick to the step by step guide to ensure you are replacing the issue correctly, ensuring you won't run into any other issues.
Have further questions about this subject?

Head over to Boshart's Knowledge Base: technical product information, guidelines, and more.

SHARE