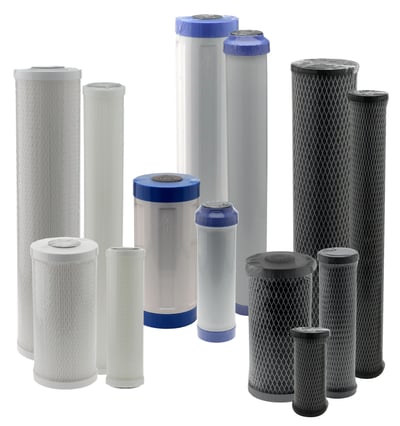
Now that you have a whole house water filter housing installed, you can fix your water quality issue with the filter cartridge that you determined will solve the problem. Remember to identify the desired flow rate when selecting the filter cartridge size.
This blog will provide important tips you should know before starting and a step-by-step instruction for installing a Point of Use & Point of Entry Water Filter Cartridge.

Important Tips
ALWAYS TEST WATER. Do not use with water that is microbiologically unsafe or of unknown quality without adequate disinfection before or after the unit.
FILTER CARTRIDGE FLOW RATES are based on “clean” cartridge performance. A filter cartridge / housing should be selected with a Gallons Per Minute rating that is 2x the desired flow rate. This allows the cartridge to do its job for an extended period before the flow rate or pressure drops to an unacceptable level. This results in the cartridge lasting closer to or up to the 6 months change-out time for maximum cost efficiency.
CHANGE OUT YOUR FILTER CARTRIDGE at least every six months to prevent bacteria build up over time. Make it part of your routine to change your filter cartridge at the same time as you change your clock.
Instructions
Application for this install are Point of Entry (POE) a place AFTER the water meter (municipal water) or the pressure tank (private water / water well) and Point of Use (POU) a place BEFORE the faucet or appliance.
- Shut off the inlet and outlet valves to eliminate system pressure.
- Place a bucket directly under filter housing to collect water.
- Using filter wrench, remove the bowl by gently unscrewing counter-clockwise (to the left).
- Remove and discard the used cartridge. Empty filter bowl into bucket.
- Remove O-rings & wipe clean of any lubricant. Inspect for damage and set aside. If O-ring is damaged, discard and replace.
- Fill the bowl 1/3 with water and add 1 Tbsp. (30 ml) bleach. Scrub thoroughly with non-abrasive sponge or cloth to remove any buildup of microbiological, rust and scale particles, and rinse. Ensure O-ring grooved seating area is free of dirt.
- Remove protective packaging from cartridge, place into bowl, fitting it over the post.
- Lubricate new or cleaned O-ring with petroleum jelly and place into the O-ring groove. Make sure the O-ring is seated level and evenly in the groove.
- Install the bowl clockwise (to the right), turning slowly until cartridge aligns with the post in the filter head - until hand-tight. DO NOT OVERTIGHTEN.
- Depress and continue to hold the red pressure relief button while slowly opening the INLET valve as water fills housing, until it flows out of relief button. Open the OUTLET valve slowly to purge air from line.
- Flush system for several minutes before use. Check for leaks.
Just remember that a filter cartridge life varies depending on usage and water conditions. Changes in taste, colour and flow of the water being filtered are signs that replacement of the filter cartridge may be necessary.
For more information, check out our 'Choosing the Proper Water Filtration Solution'.
If you are not comfortable replacing this yourself, make sure that you get a certified Plumber to do it for you. If this product is not installed correctly it may cause water issues.
Have further questions about this subject?

Head over to Boshart's Knowledge Base: technical product information, guidelines, and more.

SHARE