Any installation process if done incorrectly causes major frustration sometimes leading to an accident. Why not skip the frustration and go right to the proper installation part? Sounds good to me!
In this blog, we are going to explore one type of slide pitless adapter, the single pipe. Although there are other types of slide adapters in a variety of shapes and sizes, we will take a close look at the single pipe adapter and how to properly install it. Let's dive in.
Standard Slide Pitless Adapter
Single Pipe
Single pipe slide type pitless adapters are the most common type and they are 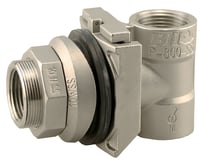 mainly used for submersible pump installations but can also be used for shallow well jet pump systems where a single suction line is lowered into the well with a foot valve attached. A shallow well jet system is limited to a 25 foot depth well or 30 feet if there is ideal conditions at sea level.
Installation Steps
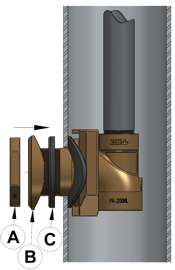
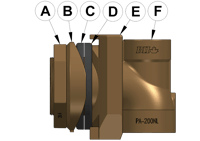 The picture on the left shows all of the components of a single pipe pitless adapter.
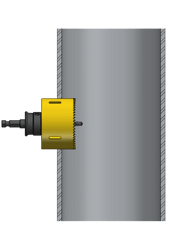
First, start off by determining the desired location to cut the hole in the well casing. Make sure it is aligned with the trench for the service line and that it is at the proper bury depth to ensure the service line won't freeze.
Using a hole saw, cut the required hole size, as specified by the pitless adapter manufacturer, through the well casing and remove the burrs. For 1" pitless adapters, the typical hole saw size is 1-3/4".
Next, you will need to remove the brass nut "A", the brass washer "B" and the outside rubber washer "C".
Safety Tip: To prevent separation of the slide pitless 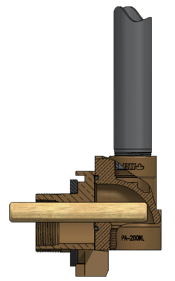 from the elbow during installation, simply insert a short piece of wooden dowel or plastic pipe in the pitless discharge of the slide into the elbow. The wood or plastic pipe will act as a safety pin. The safety pin secures the slide to the elbow and pull pipe assembly eliminating the risk of accidentally dropping the slide pitless down the well.
Caution: In order to ensure that it is impossible to make the service line connection without removing the safety pin, the safety pin should stick out a minimum of 1/4" out of the pitless discharge connection. Also, be sure it is a sufficient diameter.

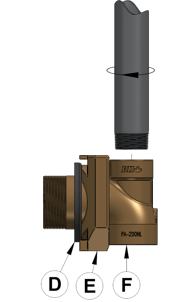
Once "A", "B" and "C" have been removed, you will need to thread a portion of steel pipe into the top of the pitless elbow "F". Then lower it inside the well casing, carefully inserting the slide through the pre-cut hole. Make sure that the rubber washer, "D" is making direct contact with the inside of the well casing.
 Step 4:
Next, you will need to install the outer rubber washer "C", brass washer "B" and the brass nut "A" from outside of the well casing. You will need to hand tighten the nut ensuring the washer contour is aligned with the casing profile.
Then, tighten the brass nut using a wrench until it is tight and the gaskets are visibly compressed. It's important to ensure the pitless adapter remains upright by holding onto the pull pipe straight in the well casing.
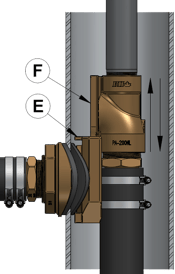
Remove the safety pin to allow removal of the elbow "F" portion of the pitless adapter out of the slide "E". At this point, you can attach the pipe column, which is the drop pipe and submersible pipe, and install the pump seating to the pitless elbow into the slide of the pitless adapter. Make sure you firmly positioned it into the slide before disconnecting from the pull pipe.
Once you have checked that it is firmly positioned, you can install the discharge pipe (service line). Once it has been installed, ensure you check for leaks prior to back filling the trench.
Making assumptions about how slide pitless adapters should be installed is unsafe and could lead to problems. Be sure to keep these installation steps in your back pocket and refer to them to ensure a trouble free and accurate installation.
Have further questions about this subject?

Head over to Boshart's Knowledge Base: technical product information, guidelines, and more.
.png)
SHARE