Stainless or Ductile? Normal well or Flowing well? Well cap or no well cap? While there are many decisions when it comes to ordering an industrial pitless unit, the answers can be easy to find. The key to properly filling out the quote form is to refer heavily to the engineers specifications. All answers should be found there. If not, you may have to give your engineer a call.
In this post, we will walk through each step to ensure the quote form gets properly filled out in a way that will save you time. We will start by looking at the contact information section, then move to the part number section, ending with the accessories section. Let's get started!
For a closer look at industrial pitless units, check out our blog Benefits of Boshart Industrial Pitless Units.
Industrial Pitless Unit Request for Quotation Forms
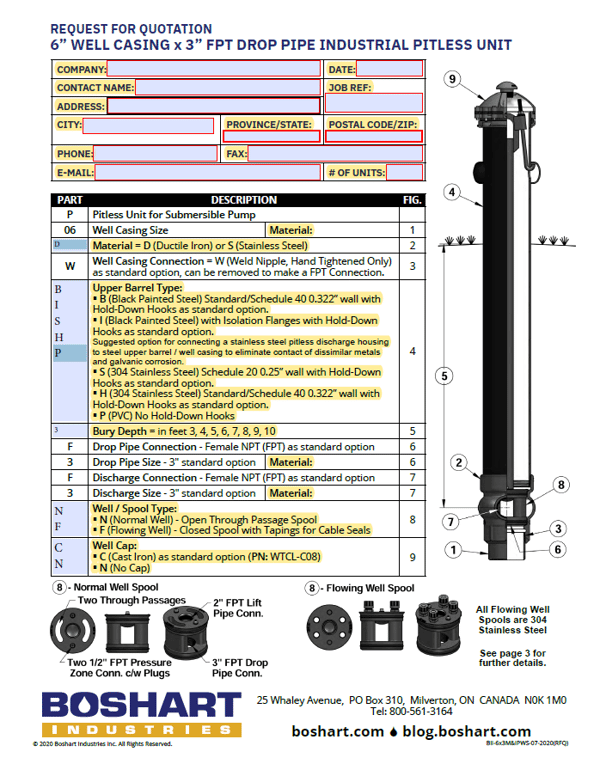
Quote forms are fillable to make completion and submission on your computer quick and convenient. The picture below is an example of a pitless unit quote form. This particular quote form is for a 6" unit. The highlighted options are all the sections that you will need to fill out. All sections are important and should be completed before submitting. Let's take a walk through the quote form.
Step 1: Filling out Contact Information
In order to properly fill out the quote form, you need to select the correct form. You can determine the quote form you need based on the size of the well casing.
First, complete the top section of the form with Company, Date, Contact Name, Job Reference Name, Address, City, Province/State, Postal  Code/Zip, Phone, Fax, Email and the number of units required to be quoted. The job reference section is the name of the job for which this unit is needed for. Both the Inside Sales Rep and the person quoting the unit need to be aware of the job name to make referencing easier.
Once all that has been filled out, we can move onto the part number section of the quote form. All pitless unit quotes will start with an engineering specification. The engineering spec will hold all the information needed to accurately and completely fill out the form. If you can't find an answer on the spec, you will need to speak to the engineer.
Now that you have the engineering spec, we can find all the information relating to the pitless unit and you can head back to the quote form and start to fill out the part number section.
Step 2: Building Part Number
The first fillable section you will come across is the material of the well casing. This is the actual material of the well casing and the option is a drop down. The well casing material may not be included with the other info pertaining to the pitless unit so you may have to look at the drawing to find the material.
After that, you can move on to the material of the unit. The options are ductile or stainless and this includes the housing and spool. This will be listed in the pitless information found in the specs along with the upper barrel type and bury depth which are the next two rows.
Next, the material of the drop pipe may be found in the engineering specification but you will most likely have to refer to the drawing. If not, speak with your engineer. The next row is the discharge material which will usually be the same material as the drop pipe. The material is important because it affects the accessories that are needed that you will run into on the second page of the quote form.
The spool type is the next required piece of information on the form and the options are normal well or flowing well. This may not be included in the pitless summary but can found on the drawing. The spool type is important as it will affect the accessories needed and how the pitless unit will function.
The last field needed to finish the part is the well cap. Similar to the above options, the answer should be found in the summary of the pitless information. The two choices are yes it requires a well cap or no it doesn't need a well cap.
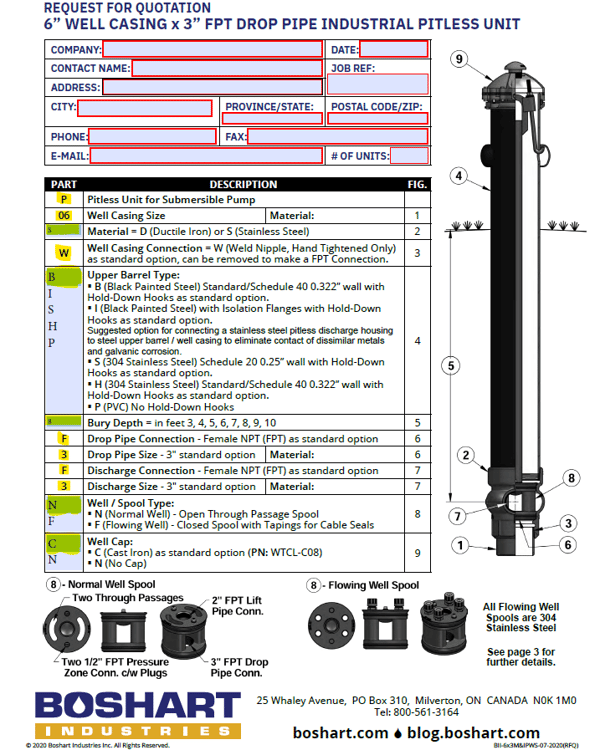
Once all the blank spaces are filled out, the part number has been created. Starting at the top of the parts column, read down to get the full part number. The picture below shows that for this example the part number is P06SWB8F3F3NC.
 Step 3: Choosing the Accessories
Now that the part number is built, we are only through the first phase. We now need to take a look at the accessory section. If the unit you are needing is a normal well there are two phases, the part number and accessory page and if the unit is a flowing well there are three phases, part number, accessory and specific flowing well accessories.
The accessory section on page 2 is laid out by the different sections of the pitless unit. The first step is the well casing. There is a possibility that you will not need a well casing connection accessory if you plan on welding the weld nipple directly to the well casing or if you will be threading the weld nipple to the casing if they are the same material. You will require well casing accessories if the well casing is a dissimilar metal from the pitless unit. If the well casing is stainless and the unit is ductile, those metals cannot be joined. If they are joined, galvanic corrosion will occur and eventually cause major issues. In order to prevent that, you can add a flange. Be sure to select the correct flange in the material you 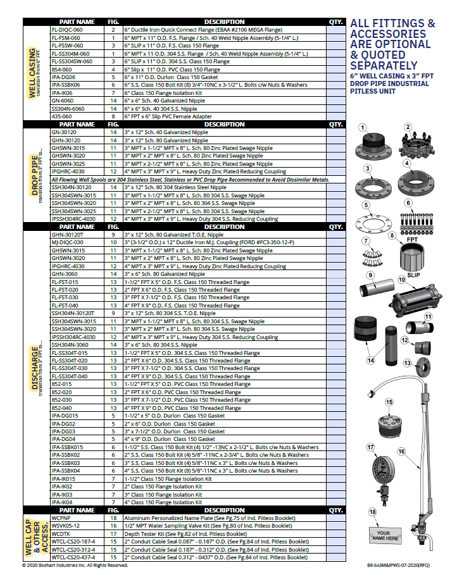 require.
Before determining which accessories you need, ask yourself one question: How is the pitless going to be attached to the well casing? If you need a flange connection, you will need to select the right flange that will connect to the well casing, you will also need the bolts. The bolt kit is required to attach the flanges together if you are connecting dissimilar flanges. The flange on the unit and well casing will be different so you will need a gasket to separate the dissimilar metals.
The drop pipe section is the next accessory option. The options are a variety of nipples. The nipple is used to connect the drop pipe connection to the drop pipe. You can select the size that works best for you based on the size and length of the drop pipe.
The discharge section is similar to the well casing accessories. You will need to know the size and material of the discharge pipe and the components needed to attach to the discharge connection. There are flange and swage nipple options. You may not require an accessory if the piping is already threaded and connecting the same material or PVC. If you are having difficulties determining the accessories you require, speak to your engineer.
The last section on the accessory page is for the well caps. The larger size pitless units have more options. Any accessories that are needed should be included in the engineer design specs.
An important note is that some accessories will refer to a certain page of our Industrial pitless booklet to get more information and to confirm if that is indeed what you are looking for. Download our Municipal & Industrial Pitless Well System booklet here.
You can purchase accessories without purchasing the entire pitless unit. All accessories are readily stocked and available.
Step 4: Flowing Well Accessories
The accessories for flowing well units are the cable seals. To select the correct cable seal, you will need to know the gauge of wire. The wire size is determined by gauge which will be included in the e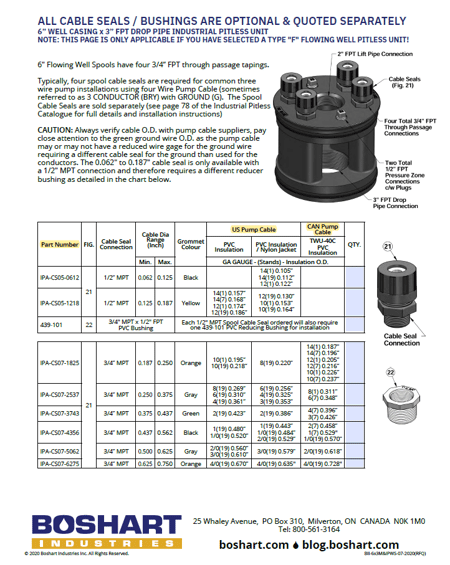 ngineer drawing. Pick the cable seal by matching up your wire size with columns "US pump cable" or "Canadian pump cable" then go to the far left column and it will tell you the part number you need. If the spool has more through passages then cable seals required, you will need plugs to plug the through passages you aren't using.
When all the applicable pages have been completely filled out, you are ready to send the quote form to your Inside Sales Rep! Quote forms that are completely finished will be quoted faster, making the entire process quicker. You can download all of our industrial pitless unit quote forms here and keep them handy for whenever you need them!
With this guide, you will be able to conquer the quote forms like a pro! As long as you start with the engineer specifications, all information should be right at your fingertips making filling out the form easy, quick and stress free. If you have any questions regarding the quote forms, contact your Inside Sales Rep and they will be happy to give you a hand!
Have further questions about this subject?

Head over to Boshart's Knowledge Base: technical product information, guidelines, and more.
.jpg)
![[Video] The Basics on Water Filtration](https://blog.boshart.com/hubfs/36.jpg)
SHARE